主理人说
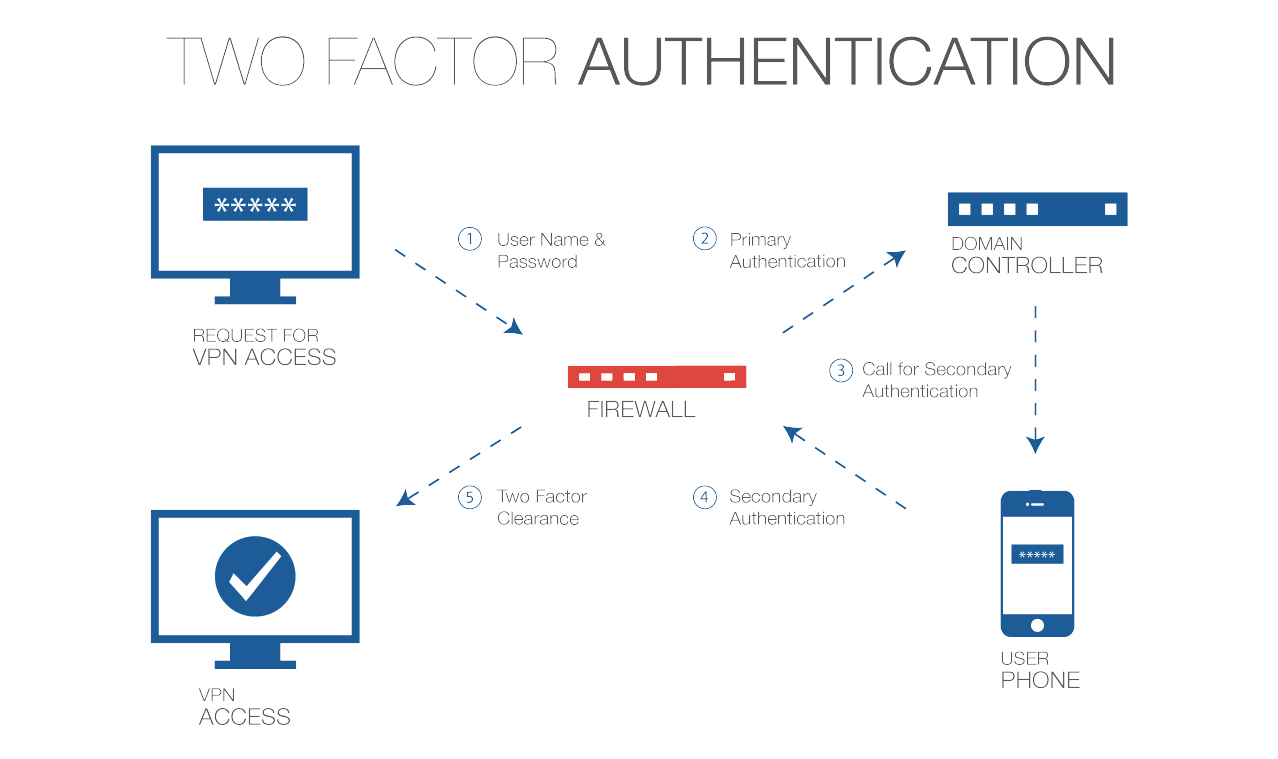
还记得前几天博主发的文章吗?:Google/Microsoft 身份验证器 (Google/Microsoft Authenticator) ,转念一想,是不是给SSH登录时也开启两步认证,就算对方真的hack成功,也没办法攻破2FA(两步认证)不是?
虽然我也部署了 fail2ban,但两步认证这个似乎可以更靠谱;
本教程包含3个步骤,1.手机📱安装2FA验证器用于生成2FA验证码;2.在服务器上配置 2FA 身份认证服务;3.为SSH客户端设置白名单,在你受信任的设备上登录服务器时免除2FA验证;
以上。
服务器系统支持说明
按理说Linux 各版本 server 均支持;Ubuntu/Debian/CentOS/Redhat等,
以下以Ubuntu 18.0.4为例,为Linux server开启登录两步认证;
2FA详细部署步骤(如何在服务器上部署)
在手机或受信任设备下载 2FA验证器
手机安装谷歌身份验证器 由于该技术是开源的,所以也有很多身份验证器被开发出来的:较为出名的便是 Google/Microsoft 身份验证器 两种,博主个人比较推荐 Microsoft Authenticator;
Google Authenticator - Apps on Google Play
Google Authenticator on the App Store
Microsoft Authenticator Microsoft Authenticator - 支持iCloud数据备份(谷歌身份验证器不支持)
*各大应用市场亦可下载安装,App Store搜索下载即可(大陆地区也有的);
在服务器上安装并配置 authenticator
更新软件源
apt-get update安装谷歌两步验证包 Google PAM Module
apt-get install libpam-google-authenticator配置Google PAM Module的配置文件
google-authenticator提示及回复
1.基于系统时间,选择是(Google authenticator 就是基于时间产生token的);
Do you want authentication tokens to be time-based (y/n) y 2.是否更新你的 "~/.google_authenticator" 文件?
Do you want me to update your "~/.google_authenticator" file (y/n) y #更新3.您是否要禁止多次使用同一身份验证令牌?这样一来,您每30秒只能登录一次,但这种情况会增加您有机会注意到甚至阻止中间人攻击?
Do you want to disallow multiple uses of the same authentication
token? This restricts you to one login about every 30s, but it increases
your chances to notice or even prevent man-in-the-middle attacks (y/n) y
4.一般而言系统时间不会有误差,建议不要开启;
By default, tokens are good for 30 seconds and in order to compensate for
possible time-skew between the client and the server, we allow an extra
token before and after the current time. If you experience problems with poor
time synchronization, you can increase the window from its default
size of 1:30min to about 4min. Do you want to do so (y/n) n
5.30秒内两步认证失误则将该登录者的IP进行限制,30秒内不能重复尝试(错误)登录超过3次;
If the computer that you are logging into isn't hardened against brute-force
login attempts, you can enable rate-limiting for the authentication module.
By default, this limits attackers to no more than 3 login attempts every 30s.
Do you want to enable rate-limiting (y/n) y
然后会生成二维码或一串数字代码,你可以*使用 Google authenticator 或 Microsoft authenticator 扫码获取token(用于下次登录),或手动输入代码;
激活 2FA in Ubuntu
nano /etc/pam.d/common-auth编辑common-auth,在末尾添加一句auth required pam_google_authenticator.so nullok;
/etc/pam.d/common-auth
...
# and here are more per-package modules (the "Additional" block)
session required    pam_unix.so
session optional    pam_systemd.so
# end of pam-auth-update config
auth required pam_google_authenticator.so nullok
此行告诉Ubuntu身份验证系统在通过Google PAM模块登录时要求2FA。使用nullok选项,即使现有用户尚未为其帐户配置2FA身份验证,也可以登录系统。换句话说,已配置2FA的用户将需要在下次登录时输入身份验证代码,而未运行google-authenticator命令的用户将只能使用其用户名和密码登录,直到他们进行配置2FA。
保存,然后退出。
要求必须使用2FA用于登录
sudo nano /etc/pam.d/common-session文件的末尾添加一句auth required pam_google_authenticator.so nullok;
# # and here are more per-package modules (the "Additional" block)
session required    pam_unix.so
session optional    pam_systemd.so
# end of pam-auth-update config
auth required pam_google_authenticator.so nullok
忽略/白名单设置(哪些IP不需要2FA)
最佳答案
在“ /etc/pam.d/sshd”中
auth [success=1 default=ignore] pam_access.so accessfile=/etc/security/access-local.conf
auth required pam_google_authenticator.so
然后在“ /etc/security/access-local.conf”上
#localhost doesn't need two step verification
+ : ALL : 192.168.1.0/24
+ : ALL : LOCAL
+ : ALL : YOURIPHERE
#All other hosts need two step verification
- : ALL : ALL
最后不要忘记重启ssh
service sshd restart部署公钥验证(SSH客户端如何跳过2FA/免密登录)
部署公钥验证
公钥用于加密数据,而私钥用于解密数据。 这种加密方式提供了很高的安全性,因为公钥是公开的,任何人都可以使用它来加密数据,而私钥则保密,只有拥有者可以解密数据。 公钥和私钥是一对相关的密钥,它们由密码算法生成。公钥可以公开分发,而私钥必须保密。 Credit net;
服务器上 公钥的存放位置:
~/.ssh/authorized_keys以 Terimius app 举例,我们不想每次在受信任设备登陆都输入两步认证动态码:
1.点开主界面 - 找到 keychain - 点击右上角 + 号 - 点击 Generate Key 生成密钥,其中 Type 和 Clipher 为可选项,为密钥进行加强;
2.保存 - 长按保存后的密钥(SSH Kyes)的名称 - 点击 edit - 此时你可以看到如下 密钥/公钥 明文;
Private 私钥
-----BEGIN OPENSSH PRIVATE KEY-----
b3BlbnNzaC1rZXktdjEAAAAABG5vbmYHJSEbm9uZQAAAAAAAAABAAAAMwAAAAtzc2gtZW
QyNTUxOQAAACCrM8wZVh6yP8yhCg2+RQniANcFF+YLvPYmQ3DNDysOgQAAAKACE3J+AhNy
fgAAAAtzc2gtZWQyNTUxOQBBBaArM8wZVh6yP8yhGg1+RQniANcFF+YLvPYmQ3DNDysOgQ
AAAEBSbFrcbXTbZDZwQ3OAPqAxwUzf6u8wD0hZ0Ln72kl0x6szzBlWHrI/zKEaDX5FCeIA
1wUX5gu89iZDcM0PKw6BAAAAFEdlbmVyYXRlZCBCeSBUZDUtaXVzAQIKOHBGBwgJ
-----END OPENSSH PRIVATE KEY-----Public(公钥,公钥等下是要粘贴到服务器的 ~/.ssh/authorized_keys 配置文件内的):格式内容如下,
ssh-ed25519 AAAAC3UxaC1lZDI1NTE5CCCDIKszzBlWHrI/zKEaDX5FCeIA1wUX5gu89iZDcM0PKw6B Generated By Termius3.在服务器上配置公钥
还是要登录一次 SSH;
3.1 登陆服务器后,打开 authorized_keys 文件,然后复制公钥(Public)内容,粘贴,保存;
vi ~/.ssh/authorized_keys4.重启sshd让配置生效
service sshd restart5.Terimius 添加Host时 ,在输入 Username(root) 和 password 后 - 请务必选择 key(在其他APP可能称之为 SSH 密钥) - 然后选择刚刚你设置的 密钥(SSH Kyes)的名称;
OK 登录;其他SSH 客户端 APP同理;如HyperApp/ServerCat;
FAQ
ssh [email protected]如上,有些用户喜欢用上述命令行进行登录,但又不想频繁输入2FA验证码的,又该怎么操作;可使用 ssh-keygen 命令生成密钥(公钥/私钥);
以下以生成 ed25519 算法公钥/密钥举例,在已登录服务器上或SSH客户端/终端均可进行私钥/公钥生成操作:
ssh-keygen -t ed25519 -C "example"输入上述命令行,回车后会提示你设置密钥存储位置及文件名,括号内为默认存储路径以及相应的文件名(path/../.ssh/id_ed25519),可以选择不输入直接回车;
最后会得到两个文件:id_ed25519 以及 id_ed25519.pub,.pub 后缀文件存储的是公钥内容,没有后缀的则是存储私钥内容;私钥放在SSH客户端/终端;
如前文所述,将公钥内容粘贴至服务器的 ~/.ssh/authorized_key 文件内(参阅前文操作);
下次再登录服务器时使用如下命令:
ssh -i path/to/id_ed25519 [email protected]path/to/id_ed25519 是你在 SSH客户端/终端 存放私钥的位置;id_ed25519 的内容应为之前生成的私钥内容;
如果提示密钥错误,可给私钥文件赋权:
chmod 600 path/to/id_ed25519参阅:设置 SSH 通过密钥登录 / SSH 密钥登录 ;
注意事项
设置两步认证后可能造成的登录失败问题及解决办法
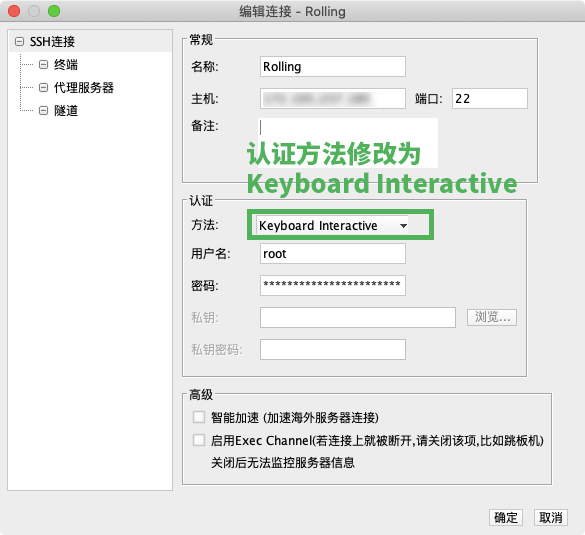
FinalShell 登录认证问题解决
配置PC SSH 软体时,记得把认证方法由之前的密码修改为Keyboard Interactive;
以上。
附注
与SSH 客户端相关推荐:https://limbopro.com/tag/SSH/ ;
资料参考
How To Configure Multi-Factor Authentication on Ubuntu 18.04
联系主理人
1.关注频道 https://t.me/limboprossr 不失联;
版权属于:毒奶
联系我们:https://limbopro.com/6.html
毒奶搜索:https://limbopro.com/search.html
番号搜索:https://limbopro.com/btsearch.html
机场推荐:https://limbopro.com/865.html IEPL专线/100Gb/¥15/月起(最高享8折优惠)
毒奶导航:https://limbopro.com/daohang/index.html本文链接:https://limbopro.com/archives/2fa-ssh-login.html · 镜像:https://limbopro.github.io/archives/2fa-ssh-login.html
本文采用 CC BY-NC-SA 4.0 许可协议,转载或引用本文时请遵守许可协议,注明出处、不得用于商业用途!