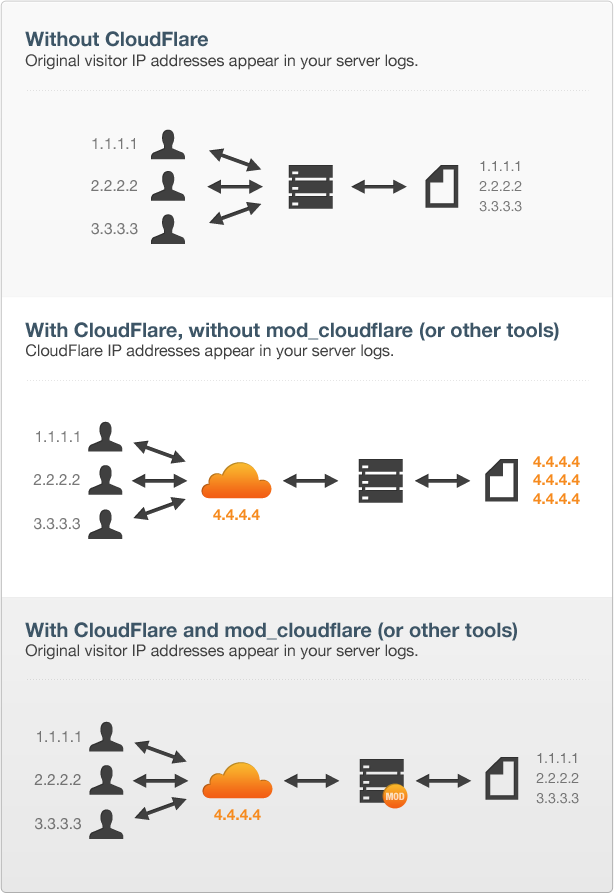
我的服务器日志为什么使用 Cloudflare 时会显示 Cloudflare 的 IP?
当站点通过 Cloudflare 进行代理时,默认情况下,源 Web 服务器访问日志会为每个传入请求记录一个 Cloudflare IP 地址。 但是使用 mod_cloudflare 工具,您可以记录传入请求的真实 IP 地址。
via Cloudflare 恢复访问者 IP(如果你是 LAMP ,请看左边链接;)
Nginx 模块 --with-http_realip_module 相关说明
概述
当您的网站流量路由经过 Cloudflare 时,我们充当反向代理。 这允许 Cloudflare 通过更有 效地路由数据包并缓存静态资源(图片、JavaScript、CSS 等)来加快页面加载时间。因此, 在响应请求并记录请求时,您的源 Web 服务器默认情况下会看到 Cloudflare IP 地址。
Cloudflare 会在名为 CF-Connecting-IP 的附加 HTTP 标头中添加实际的访问者 IP 地址。但是,如果您有其他依赖于真实访问者的IP 地址的应用程序,则可能会出现某些问题。
要解决此问题,您可以在源 Web 服务器中使用 mod_cloudflare (来自Cloudflare 官方文档)来记录真实访问者 IP。
以下提供nginx的解决办法,安装 --with-http_realip_module 模块;
动态安装模块
查看nginx 版本及已安装的模块
julia@localhost:/usr/local/nginx/sbin# /usr/local/nginx/sbin/nginx -V
Tengine version: Tengine/2.3.1
nginx version: nginx/1.16.0
built by gcc 7.4.0 (Ubuntu 7.4.0-1ubuntu1~18.04.1)
built with OpenSSL 1.0.2o  27 Mar 2018
TLS SNI support enabled

configure arguments: --prefix=/usr/local/nginx --with-http_stub_status_module --with-http_ssl_module --with-http_v2_module --with-
... ##复制这个配置到记事本或其他地方,等下要改添加 --with-http_realip_module 模块!

julia@localhost:/usr/local/nginx/sbin#
添加 --with-http_realip_module 模块
加装模块方法如下:
从上面查询结果可以知道,nginx 版本是 1.16.0;
下载 nginx 源码
以 1.16.0 为例:其他版本,在下载页面找到相同版本号的下载文件即可:
下载页面:http://nginx.org/en/download.html
$ cp /usr/local/nginx/sbin/nginx /usr/local/nginx/sbin/nginx.bak #备份nginx文件
$ wget http://nginx.org/download/nginx-1.16.0.tar.gz ## 下载nginx源码
$ tar -zxvf nginx-1.16.0.tar.gz ## 解压缩
$ cd nginx-1.16.0 ## 进入解压后源码目录

$ ./configure --prefix=/usr/local/ --with-http_stub_status_module --with-http_ssl_module --with-http_v2_module --with- --with-http_realip_module ##预设安装路径为/usr/local并添加模块并配置

...

##如上,配置末尾或任意模块后方添加 --with-http_realip_module ;关闭 nginx后,回车编译即可;(注意我改动的地方,只是添加了 --with-http_realip_module 而已!)

$ make
$ make install
$ lnmp nginx reload
如果你是用的是军哥 lnmp 一键安装包,网站 nginx 子配置文件 example.com.conf 修改参考:
server
    {
listen 443 ssl http2;
#listen [::]:80;
server_name limbopro.com ;
...
##$server 段 添加如下段落 开始
set_real_ip_from 103.21.244.0/22;
set_real_ip_from 103.22.200.0/22;
set_real_ip_from 103.31.4.0/22;
set_real_ip_from 104.16.0.0/12;
set_real_ip_from 108.162.192.0/18;
set_real_ip_from 131.0.72.0/22;
set_real_ip_from 141.101.64.0/18;
set_real_ip_from 162.158.0.0/15;
set_real_ip_from 172.64.0.0/13;
set_real_ip_from 173.245.48.0/20;
set_real_ip_from 188.114.96.0/20;
set_real_ip_from 190.93.240.0/20;
set_real_ip_from 197.234.240.0/22;
set_real_ip_from 198.41.128.0/17;
set_real_ip_from 2400:cb00::/32;
set_real_ip_from 2606:4700::/32;
set_real_ip_from 2803:f800::/32;
set_real_ip_from 2405:b500::/32;
set_real_ip_from 2405:8100::/32;
set_real_ip_from 2c0f:f248::/32;
set_real_ip_from 2a06:98c0::/29;
real_ip_header CF-Connecting-IP;
##$server 段 添加如下段落 结束
...
index index.html index.htm index.php default.html default.htm default.php;
...
修改后重启 nginx ,lnmp nginx reload; 查看一下 access.log文件,看看是否已经开始记录用户真实IP;
附注
1.查看Cloudflare 现有节点 ip 段:https://www.cloudflare.com/ips/
2.Nginx 模块 --with-http_realip_module 安装教程
3.nginx 日志 access.log 分析指南
4.其他问题可通过留言或加入我们的TG群组 https://t.me/limboprossr
5.恢复原始访问者 IP:使用 mod_cloudflare 记录访问者 IP 地址
版权属于:毒奶
联系我们:https://limbopro.com/6.html
毒奶搜索:https://limbopro.com/search.html
番号搜索:https://limbopro.com/btsearch.html
机场推荐:https://limbopro.com/865.html IEPL专线/100Gb/¥15/月起(最高享8折优惠)
毒奶导航:https://limbopro.com/daohang/index.html本文链接:https://limbopro.com/archives/1481.html · 镜像:https://limbopro.github.io/archives/1481.html
本文采用 CC BY-NC-SA 4.0 许可协议,转载或引用本文时请遵守许可协议,注明出处、不得用于商业用途!


